As a tech, I have storage media just lying around and decided to upgrade my RAID-1 desktop. This desktop is mainly used for entertainment and communication, so it is hardly critical. I would have taken a different approach to client computers or my home server, but…I was in a hurry and made a few mistakes along the way. Here is how I did it…
I know the shortcomings of fakeRAID vs true hardware RAID. I am also most proficient with Linux software RAID using mdadm. I chose fakeRAID for my desktop because it was a happy medium that would keep Windows running in case of a hardware failure. I haven’t looked into all the ins and outs of how fakeRAID stores metadata or how it works beyond the basics, because quite frankly, I don’t have time and recommend people not use fakeRAID for mission critical applications.
Of course, I have duplicate backups and in some cases triplicate and beyond. So a catastrophic failure is manageable, but not wanted. I was quite comfortable with Linux-based RAID and have migrated data many times, this was a first for me using fakeRAID.
I did a bit of research before I started and there are commercial products that may handle this task, but being the creator of the All in One – System Rescue Toolkit, I wanted my baby to shine!
The Setup
- Intel Rapid Storage Technology onboard (fakeRAID)
- 2x 320 GB HDDs RAID-1
- 2x 500 GB HDDs RAID-1
- Windows 10 Professional
- All in One – System Rescue Toolkit (LiveCD boot)
First Attempt (Cloning)
Having made the toolkit specifically for handling dmraid (fakeRAID in Linux), I could see the RAID volume and browse the data. My first instinct was to just pop in the AiO-SRT disc, fire up Clonezilla, and let it rip. I quickly discovered that Clonezilla only recognized the block level devices that made up the RAID (/dev/sda and /dev/sdb) and not the RAID itself (/dev/dm-0). I knew there was a way to make this happen.
I had already setup my second set of drives, so I had:
- /dev/dm-0 “Old RAID” with 2x 320 GB
- /dev/dm-1 “New RAID” with 2x 500 GB
dd to the rescue, I have cloned with dd before and carefully setup the first dd clone command:
dd bs=32M if=/dev/dm-0 of=/dev/dm-1
I used 32M block size to speed up the process of reading more before writing. I have seen some folks use 100M block size for speed.
This process took about an hour and a half and I left it running overnight. I woke up and groggily, but excitedly, made my way over to my PC to finish the task so I could continue using it for entertainment. First mistake, instead of booting up the clone before proceeding, I knew I would need to resize the volume. So I fired up gparted in the toolkit and blindly accepted the complaints that it made about GPT backup data. Bad idea, as this was actually asking me about “fixing” the block level devices /dev/sda and /dev/sdb for the original, working RAID volume.
When I rebooted the PC, I noticed that the Intel Rapid Storage Technology BIOS screen showed that none of my original drives was a RAID member. Oops, in my sleepy stupor, I had broken the old RAID by blindly accepting the dialogs! Gparted was discarding my RAID metadata as I clicked “yes, yes, yes”.
This was all hindsight because after my “yes, yes, yes” clickfest, I was booting and scratching my head while Windows was crashing and complaining about boot issues. Obviously, I wouldn’t roll out of bed and start clicking stuff for a more serious situation such as my server or client PCs.
Second Attempt (Partition Copy)
Alright, wake up, have some coffee, crack my knuckles and get started!
I discovered that just the RAID metadata was discarded and could boot the old RAID-1 drives independently. Whew! I didn’t have to do any partition rebuild or reinstall Windows and all of my stuff!
My new RAID-1 clone was unbootable, but the old RAID drives were bootable, individually.
I decided I would setup the RAID-1 again and install a fresh Windows, then just copy the Windows system partition over after installation. For some reason, Windows was complaining that it couldn’t install on the new RAID-1 volume.
It was probably the similar reason it wouldn’t boot to the new RAID-1 clone as well. My guess is that GPT UUIDs, RAID metadata, or something similar messed up. I wasn’t patient enough to dive into the underpinnings of what was going on.
I booted a single original RAID drive and decided to scrap the project and use Windows “mirroring” for data protection and just move on with life. But, I had an idea later that afternoon…
Final Attempt (Cloning)
So, I have a working single drive installation of Windows now. I had used Windows “DiskPart” to “clean” the original RAID mirror drive, which dumped all the metadata, parititon tables, etc when setting up Windows “mirroring”.
I had the idea to nuke the new RAID-1 drives using “DiskPart clean” and then I can try to use this single boot drive to clone to my new RAID.
Also during my research into the dmraid (fakeRAID) world, I saw that there were 2 different devices /dev/dm-0 and /dev/mapper/xxxxxxxxx.
I installed the application ‘pv’ into my LiveCD environment so I could check the status of dd because I was tired of dd cloning by this point.
What finally worked was:
sudo apt-get install pv
sudo su
dd bs=32M if=/dev/sda | pv | dd bs=32M of=/dev/mapper/xxxxxxxx
/dev/sda was my original single drive broken RAID that will still booting Windows. After booting the new RAID-1 into Windows, I noticed that the raid was in ‘resync’. I didn’t care because it meant something worked. It took a bit to resync, but afterwards, I used Windows “disk management” to resize the partition and was good to go!
I wasn’t hopeful this would work, nor did I look into why this actually worked, but my assumption was that I could have originally used:
dd bs=32M if=/dev/dm-0 of=/dev/dm-1
-OR-
dd bs=32M if=/dev/mapper/original_RAID_id of=/dev/mapper/new_RAID_id
Then I should have just let the volume boot up, resync and do whatever it needed to before starting partition management.
Conclusion

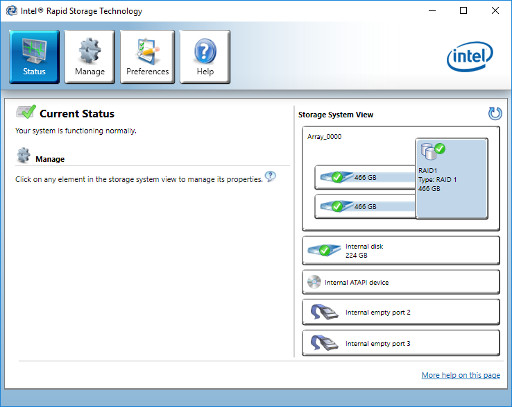
It works now, as pictured above. After all is said and done, I should have done the proper thing to begin with and saved some headaches. I was trying to cut corners and get back into using my entertainment beast as quickly as possible by cloning without the proper knowledge base.
The Slow, but Guaranteed Way to Upgrade RAID
This is what I was trying to avoid doing:
- Gracefully remove 1 hard drive from the RAID array
- Add the upgraded drive and let it resync
- Gracefully remove next hard drive from the RAID array
- Add the upgraded drive and let it resync
- Rinse and repeat for all drives
- Expand the volume using preferred partition managment tools
Lessons Learned
- Don’t roll out of bed then try to do complex tasks such as RAID and partition management
- Eat your Wheaties before you try doing clone jobs
- Even an IT veteran can still make rookie mistakes when not paying attention
- I state it on my toolkit page: “Just because you have a hammer doesn’t mean you know how to build or fix a house.” Know how to use your tools and what they do!


Have 2 x Hitachi 2TB with 2 arrays ( 300GB RAID1 and 3.7TB RAID0) over Fakeraid (AMD 990X/SB950).
Yesterday my RAID1 was REBUILDING but always crash at 22%
Today RAID1 looks OFFLINE (one of the hdd shows errors on raidxpert app and the raid1 array is missing and appear as FREE SPACE, but in the other drive looks like the RAID1 its there).
RAID POST ROM shows the RAID0 Functional but RAID1 Offline.
I am trying to copy/backup the raid1 partition from the good drive but don-t know how to read it, dont know how to get it visible 🙁 I am downloading your iso for flash it on an USB and try to understand your tips as last hope. If you read i will apreciate a lot any help, THANKS